Doppler Log Installation Guide
Doppler Log Installation Guide: Key Precautions and Step-by-Step Procedures
The Doppler log is a vital navigation device extensively used on marine vessels, delivering precise speed and distance measurements relative to the water or seabed. Proper installation directly impacts its operational stability, measurement accuracy, and service lifespan. This article elaborates on the key precautions and standard installation procedures for Doppler logs, serving as a professional reference for marine engineers, vessel maintenance technicians, and relevant industry professionals.
Key Precautions Before and During Installation
Prior to initiating the installation, thorough preparation and strict compliance with safety and technical guidelines are indispensable to avoid common issues such as signal interference, water leakage, and inaccurate data. Below are the core precautions to adhere to:
1. Site Selection and Preparation
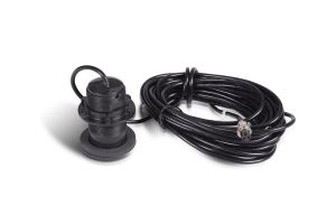
The installation location of the Doppler log transducer (the core component responsible for emitting and receiving ultrasonic signals) is critical. It should be mounted on the vessel's hull in an area with smooth, undisturbed water flow. Avoid regions with hull protrusions, propeller turbulence, intake/outlet pipelines, or other equipment that may disrupt water flow-these factors can result in distorted signal reception and inaccurate speed readings. Additionally, ensure the installation site boasts sufficient structural integrity to support the transducer's weight and withstand seawater impact during navigation.
Before installation, thoroughly clean the hull surface at the selected site. Remove any rust, paint residues, marine fouling, or debris to ensure tight contact between the transducer and the hull, preventing water leakage and ensuring stable signal transmission. For wooden or fiberglass hulls, additional reinforcement may be necessary to avoid structural damage during installation or vessel operation.
2. Equipment Inspection and Compatibility Check
Before unpacking and installing, inspect the entire Doppler log system, including the transducer, control unit, cables, connectors, and mounting hardware. Verify that all components are intact and free from damage (such as cracks on the transducer surface, frayed cables, or bent connectors), and that the model and specifications align with the vessel's navigation requirements. Check compatibility between the Doppler log and other on-board navigation equipment (e.g., GPS, echo sounder, autopilot) to ensure seamless data integration and communication.
It is also crucial to confirm that the vessel's power supply voltage and frequency match the Doppler log's requirements. Using an incompatible power supply can lead to equipment burnout or unstable operation.
3. Safety and Environmental Compliance
Installation operations should be performed while the vessel is safely moored and the hull is stable. Ensure the work area is well-ventilated and free from flammable, explosive, or corrosive substances. Operators must wear appropriate personal protective equipment (PPE), such as non-slip shoes, gloves, and safety helmets, to prevent falls, collisions, or injuries from sharp tools.
For underwater installation or hull drilling operations, strictly comply with marine safety regulations and obtain relevant permits. After installation, ensure the hull structure remains undamaged and that the installation meets the vessel's classification society standards and international maritime safety requirements (e.g., SOLAS conventions).
4. Cable Routing and Protection
Cables connecting the transducer and control unit should be routed neatly, avoiding sharp edges, high-temperature zones, or areas with strong electromagnetic interference (e.g., near engines, generators, or radar equipment). Electromagnetic interference can disrupt ultrasonic signals transmitted through the cables, compromising the Doppler log's accuracy.
Use cable clips or brackets to secure the cables, preventing them from being pulled, twisted, or damaged during vessel navigation. Ensure cable connectors are tightly sealed with marine-grade waterproof materials (e.g., marine sealant, heat-shrink tubing) to prevent seawater ingress, which can cause short circuits or component malfunction.
Step-by-Step Doppler Log Installation Procedures
Installing a Doppler log typically involves six key steps, from site preparation to final testing. Follow the procedures below to ensure a standard and efficient installation process:
Step 1: Mark the Installation Position
Based on the site selection principles outlined above, use a marker to mark the exact installation position of the transducer on the hull. Ensure the marked position is level and perpendicular to the waterline to guarantee accurate transmission and reception of ultrasonic signals emitted by the transducer. For transducers requiring specific installation angles (as specified by the manufacturer), use a protractor to confirm and mark the angle precisely.
Step 2: Drill Mounting Holes (If Required)
If the transducer needs to be mounted through the hull, use a drill bit of the appropriate size (matching the manufacturer-supplied mounting bolts) to drill holes at the marked positions. During drilling, control the drilling speed to avoid damaging the hull structure or creating burrs on the hole edges. After drilling, thoroughly clean the holes to remove any metal shavings or debris.
For hulls made of special materials (e.g., aluminum alloy, fiberglass), use drill bits designed for those specific materials to prevent cracking or deformation.
Step 3: Install the Transducer
Apply a thin layer of marine-grade waterproof sealant to the contact surface between the transducer and the hull. This sealant not only prevents water leakage but also enhances transducer stability and reduces vibration during vessel operation.
Align the transducer with the mounting holes and secure it firmly using the provided bolts, nuts, and washers. Tighten the bolts evenly to ensure the transducer is installed horizontally and tightly bonded to the hull-do not over-tighten the bolts, as this may damage the transducer or hull surface. After installation, inspect the sealant for gaps and apply additional sealant if needed.
Step 4: Route and Connect Cables
Route the signal cables and power cables from the transducer to the control unit in accordance with the pre-planned path. Ensure the cables are not kinked or stretched and are securely fastened with cable clips. Avoid routing cables in areas where they may be exposed to mechanical stress or environmental damage.
Connect the cables to the corresponding interfaces on the transducer and control unit. Ensure the connectors are fully inserted and locked in place. After connection, wrap the connectors with waterproof tape or heat-shrink tubing to enhance water resistance. Clearly label the cables to facilitate future maintenance and troubleshooting.
Step 5: Install the Control Unit
Mount the control unit in a suitable location on the bridge or in the navigation compartment. The location should be easily accessible for operation and maintenance, and away from direct sunlight, high humidity, or strong electromagnetic interference. Secure the control unit to the mounting bracket using screws or bolts, ensuring it is stable and does not vibrate during vessel navigation.
Connect the control unit to the vessel's power supply and other navigation equipment (if applicable) in accordance with the manufacturer's instructions. Double-check all connections to ensure they are correct and secure.
Step 6: Test and Calibrate the System
After completing the installation, conduct a comprehensive system test to verify the Doppler log's functionality and accuracy. Turn on the power supply and check if the control unit displays normal information (e.g., power indicator, signal strength, speed readings).
Perform a sea trial or water test to calibrate the Doppler log. Compare the speed and distance measurements from the Doppler log with those from other reliable navigation equipment (e.g., GPS) to ensure accuracy. If any deviations are detected, adjust the transducer angle or system parameters in accordance with the manufacturer's calibration guidelines.
Finally, document all installation details, test results, and calibration data for future reference. Conduct regular inspections and maintenance after installation to ensure the Doppler log's long-term stable operation.
Proper installation of a Doppler log is critical to ensuring the safety and efficiency of marine navigation. By following the key precautions and standard step-by-step installation procedures outlined in this article, you can minimize the risk of equipment failure, ensure accurate measurement data, and extend the Doppler log's service life. Always refer to the manufacturer's installation manual for model-specific requirements and guidelines, and consult professional marine engineers if you encounter any technical issues during the installation process.